Painting Class
Botanical
Gelli Prints
This course covers all the aspects of the Gelli™ Plate Printing; from playing around and creating wonderful backgrounds to working out the results with various mixed media techniques. To make it extra fun, the theme of this class is ‘printing botanical items’.
Watch the video
What is Gelli™ Plate Printing?
I love working with Gelli™ Plate printing techniques or Gelatine printing to create some cool textures and designs. It is a cheap, easy, and fun way to get creative and create some art. Gelli™ plate printing is a mono-printing technique that works with a plate made out of glycerine and gelatine. The plate is inked with paints or ink, and impressions are made using stencils and various natural materials like leaves or plants, flowers etc. Paper is then laid on top of the plate and a paint or ink impression is pulled off. I prefer to use acrylic paints and inks for my printing, like most Gelli™ plate creators do.

Play, Print, Paint, Create!
This painting course covers all the aspects of the Gelli™ Plate Printing; from playing around and creating wonderful backgrounds to working out the results with various mixed media techniques. To make it extra fun we work with botanical items during this class.
Like in all my other courses, you have a lifetime access to this class and you can watch the video lessons when and where you want. The class is completely self-paced. You’ll receive a downloadable workbook that you can use as a reference guide. This and all other classes are available at my school: Brave Art Academy.
By the end of the class you will be able to use all the basic techniques for Gelli plate printing. Also you can vary in options of stamping, stencilling and using glazing medium. You will have a collection or series of your favourite botanical prints that you finished with various techniques, such as inks, pens and markers.
Feedback on your work and to other students, questions & answers, photos of your work etc via the Brave Art Academy Classroom that is corresponding with this class.
Watch the introduction video to get an impression of what you can expect in this painting class!
Duration: ± 3 hrs and 45 min.
Suitable for all levels of experience.
Self-Paced Painting Course – Video Lessons Easily Accessible Via Your Standard Internet Browser on Mac, PC, Smartphone or Tablet – Printable Workbook Included – Feedback from Luz and Fellow Students Via Private Classrooms.
Price: USD 95
I really enjoyed the workshop ‘Botanical Gelli Prints’ Now it’s the day after and I’m looking at the prints I’ve made. Working on those, I felt like a child again. Spreading paint, putting flowers and plant material on the plate, covering it with a printing sheet and every time the result was a surprise. It is so special!
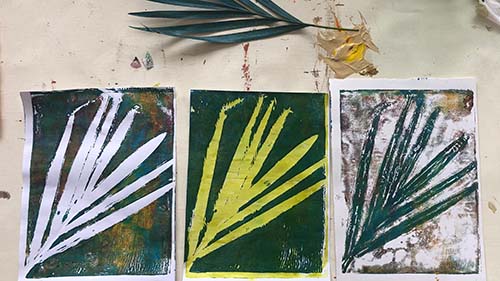
Printing leaves
Using plant material in combination with the Gelli plate can give astonishing results. You collect your own botanical ietms.
To make it extra personal, you learn techniques to create your own (longer sustainable) botanical inspired stencils.
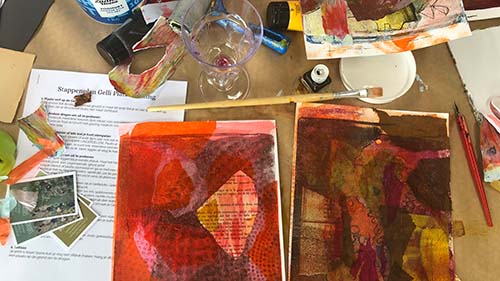
Working out your prints
In this class I offer you several options to finish your prints and create a collection or a series with an overlapping theme.
Some prints dont’ need anything more than a few lines with a fineliner or a brush strokes. On other ones you could overlap parts with transparent layers.
Once you have selected your favourties, you could make a series of postcards out of those or hang them on your wall. It’s also a wonderful present to give to your loved ones.
2 Bonus lessons
1. Working out several Gelli prints from a beautiful Monstera leaf.
2. Never throw away your ‘failure’ Gelli prints! You can use them for the mixed media bonus lesson. Create a wonderful angel, a flower piece or anything you like.
You learn all the techniques in this extra part.

This course is very inspiring. Bought my gelli-plate 6 months ago and was already bored after one time use. I washed my plate again after every coat of paint. Learned here that I can just continue working with new colours on the same plate and that it works very nicely if you can still print left-overs from your previous layer. Cool to learn glazing too, that offers even more possibilities. In short: recommended!
Course Curriculum
Section 1: Start
Welcome (6:50) FREE PREVIEW!
How this class is designed (2:04)
More about Gelli Plate printing (5:05)
Materials (7:17)
Inspiration (6:40)
Download the workbook
Section 2: The playful part
Gelli Plate printing basics (12:49)
Playful with the small Gelli Plate – Part 1 (13:25)
Playful with the small Gelli Plate – Part 2 (10:17)
Playful with the large Gelli Plate – Part 1 (14:15)
Playful with the large Gelli Plate – Part 2 (10:22)
Section 3: What to do with your Gelli Prints
Options for what to do next (11:43)
Gelli plate glazing basics (3:18)
Glazing with the small Gelli plate (11:36)
Glazing with the large Gelli plate (11:23)
Designing a stencil (13:10)
Stencilling – Large plate (16:43)
Stencilling – small plate – Part 1 (14:02)
Bonus lesson: The Monstera leaf (5:23)
Evaluation stencilling (5:31)
Cleaning your Gelli plate (4:10)
Just a finishing touch – small prints (16:18)
Just a finishing touch – large prints (14:33)
Just a finishing touch – all prints (6:32)
Bonus lesson: A mixed media project with Gelli prints
Creating an angel with Gelli prints (14:27)
The Angel (2:05)
Create a botanical series

List of supplies
Substrate
Gelli plate printing can be done on paper, but also on cotton or other textiles. In this workshop I’ll just show you how I work on paper. I advice you to work on thick paper, 200 gr. or more, especially if you want to use mixed media techniques. You could use all sorts of paper, like Kraft paper, old book pages and coloured paper.
Painting items
In this class we work with acrylic paint. I use paint from the brand Winsor & Newton Galeria and Royal Talens. I sometimes use very cheap paint for Gelli printing as well, because it’s often thinner.
In the class I’ll be showing you how to work with glazing medium combined with fluid acrylics. I also use some acrylic inks on the plate, and to give a finishing touch to my art pieces.
The Essdee brayer is my best friend. In this class I use the 4” soft brayer. To refine my work I use brushes in various sizes and shapes. My favourite ones are from the Raphael series. A tin or jar and kitchen towels to clean your brushes.
Printing items
I will encourage you to look for things in and around your home for botanical items to put on your Gelli plate that provide texture. Of course, you are free to use premade stamps and stencils. But I am sure you could do it without those!
And finally…
At the end of the course you might need some mark making tools, such as markers, fineliners, pens or soft pastels. For the bonus lesson you will need glue or gel medium to make your collage.
Don’t forget…
It’s handy to keep water, kitchen towels and hand gel within reach. Also think about something to protect your table and an apron to protect your clothes.
What you’ll get…
Direct & Lifetime Access
The ability to watch the course at your own pace, when you want to, as often as you wish. You can watch it from your desktop, but also from your tablet or your phone in a browser or with a special iOS app.
'Botanical Gelli Prints' workbook
A workbook to download and / or print, with exercises to get you started, background information and a detailed explanation of all materials.
Membership of our Community
An invitation to join our private Facebook community Luz Artworks, where you meet with fellow artists. This is a great source of inspiration and a chance to share your work and gain valuable feedback.

Your art teacher: Luz
Marloes Bloedjes alias Luz is an artist living in The Netherlands, creating colourful, abstract paintings and mixed media artworks. She enjoys long walks in nature. Back home she mixes her impressions with her rich inner world. When these two come together, magical creations are born. In addition to her work as an artist, she teaches adults and children in her studio since 2010.
Since 2018 Luz is developing online classes, together with her partner, photo/videographer Anthony Verolme.
“In my art I feel a deep connection with myself and my inner world. If there were no art, there were no me.”
Frequently Asked Questions
When does the course start and finish?
This is a completely self-paced online course – you decide when you start, how long you work and when you finish. The class is permanently open and of the course material will be available for you to view, download and work through.
How long do I have access to the course?
How does unlimited access sound? After enrolling, you have unlimited access to this course for as long as you like – across any and all devices you own. What level is the course suitable for? This course is for anyone who has ever wanted to sketch and paint trees. The material is suitable for beginners and more experienced artists.
Do I need all the art supplies?
This list of supplies is split up in two categories. There are some basic requirements, you’ll need a surface to work on, (like a canvas), acrylic paint and paper for your pattern designs. It’s up to you what else you use! The good thing about mixed-media is you can make a lot of stuff without much supplies.
Do I need high speed internet for the course?
Yes, you will need a good internet connection to view and/or download the video content for this course. If you’re using the Teachable app on your iPad or iPhone, you could download all lessons to watch them offline.
Do I need to have experience with mixed media before I start with this class?
This class is suitable for all art levels, whether you are a beginner or an experienced artist. Everything will be explained step by step, I’ll teach you a lot of techniques so there will be something new for everybody joining the course! Being open and eager to learn are more important than the level you’re at!
Will there be an online community for this course?
Yes, I will provide details of how to submit a request to join the Luz Artworks Facebook community. There is also a hashtag #treesinthelight that can be used on Instagram and other social media platforms.
What is the Enrollment & Checkout procedure?
Enrolling is easy and fast! Just hit one of the buttons on this page, put the course in your cart and proceed to the checkout. You’ll recieve the login instructions and link to your personal course page via a return e-mail.
If you need assistance signing up or when you ‘d like to use another payment method, don’t hesitate to contact me personally via email: [email protected]. When you don’t receive a confirmation email after successfully signing up, please check your email spam box.
Other courses


